Pitts S1 C-GIPS

Jan - July 2009 - Re-fabric Wings

Dragged out the wings recover as long as I could.  Finally peeled the sagging, stretched, billowing fabric off in December 2008.  Nothing broken inside, just a little woodwork and a recover. 

Idler needed a couple of new KP4 bearings, and this time I put a tube spacer  inside between the two bearings to eliminate the side load with the bolt torqued up.


Tough Decision: after drooling the 30% hinge SS ailerons for several years, I looked at the new-condition ailerons and wings with the fabric off, thought about how the airplane rolled and felt with the larger spades.......and couldn't justify another set of ailerons and redoing the aileron bays.  If I was starting from stock it would have been a no-brainer, but with most of the performance already there I just couldn't justify the extra time from what I've already got.  It will never be an MX-2, and the old wings beat a bunch of them at AWAC.
Over the last 20 years one by one all the aluminum trailing edges had gotten beaten out and were replaced with wood except for the lower left.  I changed the last one out to match. 

Finally measured the wingspan.  After decades of telling everyone it was about 15', it turns out to be 15' 9".  Now we know.  Top ailerons are 52.75" at the trailing edge, bottom ailerons are 49.25"


Say goodbye to oily smelly shirts.  I removed the smoke-oil tank from the upper wing center-section.  Maybe get one of Raven's fiberglass fairings for the wing attach.

I never did use the wing tank for fuel.  130 knots, 2.5 hours to dry tanks always seemed like enough range and about as long as I wanted to sit at one time.


Top of upper wing center section with the hole I'd  cut out to remove the wing tank now repaired and filled in.  That's plain bondo doing the fill and working good.  Resealed everything with S-1 Epoxy Sealer.

I noticed the fabric had lifted from some of the plywood panels in the last few years.  Last summer I had to lay down strips of screws  on top of the fabric like rib lacing just to finish off the season. I think  the Polybrush needs a little help, so I'm going to follow Craig Dobesh's advice and lay a strip of  #6 screws on tinnerman washers through reinforcing tape, spaced 2" along the plywood edge. 
 

Top wing getting the fabric Poly-Tac'd on.  Bottoms already done.  Working in the garage, so I've got to time the Poly-brush application for when the house is deserted. I'm going to test out that old adage of  "a family that rib stitches together, stays together".


Rib stitching - my experience

I followed the Kimball school of thought:  Heavy 3.4 oz fabric, round cord, modified seine knot with the runner on the outside.  That 1" spacing means a lot of knots.  Takes five arms width pulls of cord for the long ribs, 4 for the short ones.

Kimball's advice:

Both the flat and round cords meet the minimum requirements for strength when used as rib lacing.  The round exceeds the minimum by a far greater margin than does the flat.  I have tested this.
 
As I wrote in my previous post, we do not use the hidden knot because the lacing system cannot be made as tight as with the above surface knot.  Specifically, the connection string between each stitch cannot be made guitar string tight as when using the 4313 exposed knot method.  Some will say the connector need not be tight and I respecfully disagree since each stitch can become loose if the connectors are not tight.  This is way there is a starting and ending proceedure for lacing.
 
I have seen stitches on acro airplanes cut in two and I have seen the stitches cut through the reinforcement tape and base fabric.  In both of these instances, the stitches were not tight. 
 
For certified aircraft, I believe there are only 2 knots.  Standard above surface knot as per FAA 4313 manual and the hidden knot as developed by Beech Aircraft for the staggerwing which is the knot shown in the polyfiber manual.  PF manual says you can use the 4313 knot if you want.  I think it is important to use only these 2 knot styles since using some other way may be a bit like using a bent over nail to hold sheet metal together instead of using proper rivets.
 
We use round cord and above surface knots on ALL the airplanes we build.  The reason above are primary but another reason is the speed in which the lacing can be completed.  Hidden is slower and more tedious. 
 
I have often had people come up to the airplanes we have covered at a show and not be able to find the knots.  They are there and are easy to see if you look in the right place but done neatly, are not unsightly evey with the lightest weight fabric over the stitches.
 
When discussing twist in the cord, I was referring to the difficulty in keeping the string flat as it crosses the rib AND keeping the connector string flat between each stitch.  If using hidden, you can get away with lots of twist in the connector but not when using the above surface knots.  Going back over the stitches and pushing a twist off the rib and into the hole as you do is a secondary operation which again whould have to be billed out to a client.


Had some advice from Peter Groves( who put out the "Precision Wings" kit, similar to mine):

 
"I always had good luck by starting with the wing upside down, and two pieces length wise to the center of the center section, , and a seam chordwise in the middle, you can also overlap each piece to the end of the ply cover each side, to avoid a tape seam in the middle, as then the tape lines up with the rib either end of the ply cover.
 

Where the wing transitions from taper to straight at the leading edge, try to keep the fabric as one piece, it requires careful cutting and fitting at this point, as otherwise this area tends to work, and crack (as you well know!) if you can carefully shrink a tape in one piece over this joint it also helps to avoid any future cracking. 

 
Use a biased tape for the center section bow, it makes for an easy clean tape, and also use biased tape for the tip ribs, as again it pulls over nicely with no cutting, (notching) required.
 
As you say, 2 inch overlap on the leading edge is good, and try to roll the seam around, although in the past I can remember biasing the seam to the top of the leading edge as it is less noticable than below, and same the lower wings but opposite, bias the seam to the bottom surface.
 
Inspection, as you said rings under idlers, and bellcranks, and not a bad idea to allow future access to tighten drag/anti drag wires on occasion, although I think by now Gips is about as stable as it can be!
Plan on using the flush covers, they hold on much better."


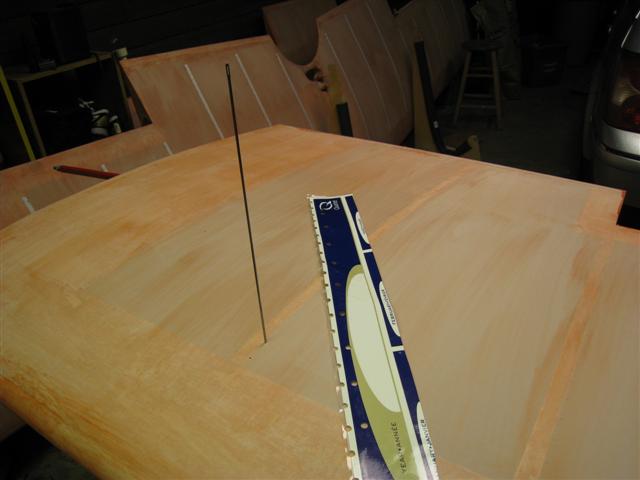
1" stitch spacing everywhere except on the plywood covered edges where I went with 2" spacing.  Took strip from a plastic calendar and used a hole-punch to make a line of 1" holes along an edge.  Lay it down, mark location with  a pencil, then stab the mark with  needle.
Plywood drilled 7/64" to let the needle through.  Stitched the walkways and inside of the I-strut bay like this.  Used screws on washers on the center section and outside of I-strut bays.
Wing standing leading edge down, working from the bottom .Some backlighting made pushing the needle into the right hole easier to see.
Stitching starts at the leading edge.  Two loops around to start helps keep the first one tight and stops it from getting pulled forward.
Reef knot.  Tied with wax cord this easily pulls apart, which is why you then do a...
.....half hitch at both ends (around both cords) to lock the knot.
Now up and across to the next stitch.  If you press your eyeball up against one of those tiny needle holes you can just see the needle tip to poke through the other side.
Tried the tinnerman washers with #6 flat head screws and it didn't work.  Stands up too high. 

I  ended up using  the thin 1/2" aluminum washers under and a #4 x 3/8 sheetmetal screw.  AS  #09-19100, and T4x6 truss head, Type A, stainless.

Needles - used the straight one mostly.  The "hidden hitch" that PolyFiber recommends using the curvy tip needle doesn't work well with 1" spacing and heavy fabric.  I ended up bending that one into a bow to lace the compression ribs with the extra wooden beam along the sides.  Handy for going around other internal obstructions too.
One of the frustrations was getting the rib stitch tight.  Sometimes the knot would get tight and the stitch would still be a little loose.  With enough wax on the string you could give it a little tug and sometimes it would tighten the last bit - and other times it would break.  Here's the knot set up and ready to tighten (pulling the loose string hanging down)
Put your thumb over the knot shown above, move the loose string to the 30 degree off top and close to the wing as shown, and pull tight.  Perfect every time.
Alternate stitching, 2" on top, 1" on bottom.  More awkward with Sparcraft routed plywood ribs, probably works OK on the built up ones.  PIA.


Inspection Rings and Tapes  
Inspection rings on.  Aircraft Spruce doilies work great.

Presoaked the stitching and reinforcing tapes per the Polyfiber manual, now it's tape time.

I had some questions on taping, so I posted them to the Oracle:

The 4" tape that goes over the leading edge, anybody got any suggestions on how to get it to form around the sweep center section?

Also manual says to do the lengthway (over the ribs) taping first and the crossway (like along the leading and trailing edge) last.  With squared off wingtips, to the edgetapes go on last or at the same time as the lengthways?  Same question for the ailerons.
KKimball came back with:

 Shrink the tape at the sweep. Put it in place and shrink the excess that is at the edges where the sweep starts. Easy to do. You can practice with a short piece of 4" held in place with masking tape to get it right before you do the long one from tip to tip.

Order of tapes:
1. Skew tapes (diag, braces, ail butt rib double, etc)
2. front spar tape
3. rear spar tape, non ail bay area
4. ribs in aileron bay
5. ail bay trail edge tape (over rear spar)
6. long ribs inboard of aileron
7. leading edge tape
8. tip rib (because of your tip shape)
9. trailing edge tape and CS bow tape
10. inspection rings, patches, fitting patches, etc.

OK, taping is all done.  Have gone over every seam and tape with the little iron to get it as smooth as possible before painting.

As you can see I am back in the hangar.  After a few nights of MEK induced hallucinations, I came home to find my family had thrown both my wings and my suitcases out onto the front lawn.  You need a detached garage to get away with fabric work at home.

Inside ribs got a second 3" tape on top of the 2". 
Duh! Thought I had everything inside tightened before the fabric and turns out I forgot the aileron attach fittings on the lower wings that were a little loose.  No need for another inspection cover,  carved a 3/8" x 1/2" hole (just big enough for the end of my smallest 3/8" box end wrench) in the plywood end plate and reaching the nuts that way.  Tiny fabric patch over the hole.  Whew, that was easy.
Not wanting to exhaust the goodwill of friends to help me transport the wings back and forth to the paint shop, I strapped down a truss made up of a pair of  2"x6"x12' onto the shortbox of my Ridgeline.  Couple of foamies and straps and I was in business
I didn't think the wings could eat up all 3 gallons of Poly-Brush plus 5 Gallons of Poly-Spray, but with all the cross-coats they did.  Punched in the drain holes on the bottom trailing edges with a soldering iron. Then 1 coat of Primer Sealer (about 3/4 gal).   Spray the white first (1/2 gal), then mask off the pattern, and two coats of topcoat (1-1/2 gal) .
Voila! All done, now let's get back to flying.


Updated July 4, 2009